Sunday, 4 May 2014

May Day May Tag


It's the holiday weekend, and of course it is raining.  We were intendingto go to Dobbies for bedding plants and stuff for the hanging baskets, but the rain gave me an excuse to stay indoors and play about in my craft room.  I recently ordered some new dies and embossing folders from the fantastic Sizzix sale, which arrived on Friday, so I was dead keen to get in there and start messing with them.  Spent a while unwrapping and examining them all, as you do, and it was only when I started to do my May tag that I realised that one of the items I ordered is missing, so I will have to ring Sizzix and get that sorted.  I ordered the movers and shapers old jalopy and arrow, but it was not there and it would have been great on this tag - I was going to use the jalopy in place of the butterfly that Tim put on his, but never mind.
Tim's tag did not have a theme, but he made it with the advice to crafters to stop hoarding all our ideology charms and stuff, and actually get it out and use them in our projects.  LOL, that's me. Got a drawer full.

 Tim's May tag showcased ideology bits and pieces, so I had lots of those to choose from.  Anyway, I'd decided to make mine on a travel theme, old jalopy or no, so here it is:


I did not have the Shadowpress embossing folders that Tim used, but found that one of the Texture Fades embossing folders from a set called 'Travel Signs' ( one of the folders I had just received) had some partly debossed words in it, so I used the word TRAVEL from the embossing folder.  Using his ink technique, where you ink the actual folder before inserting the. paper and putting it through the embossing machine was a bit scary, but it worked a treat and the leftover ink did come off the plastic with a bit of buffing with a baby wipe, so that was alright.  The little train is made of wood and is from a set I got in Hobbycraft.  I inked it with felt pens and embossed it with several coats of embossing powder, including a dip into silver embossing powder at the end, to metallise the wheels.

The white bird in the frame at the top is cut for another texture fade embossing folder (called Patchwork) which i embossed on white card and Then gave 3 layers of clear embossing powder to turn it into a 'charm'.  The chipboard frame it is in was one I had In a drawer, out of the packet so no idea who makes it it was originally cream with blue glitter, but I gave it several coats of silver embossing and then pressed a paisley patterned rubber stamp into it before it cooled down.

All the other items are Tim Holtz, including the background papers which are a mixture of his Retro Grunge and Seasonal stashes.  

The only thing I would change would be to use thicker chipboard behing each item.  Mine is quite thin and it looks too much like I've just stuck bits of paper behind each piece. Tsk.


My other project today was another altered metal biscuit tin.  I got this one from a charity shop a couple of weeks ago, and after I took the sticky labels off I stuck some embossed metal tape on it, added a Tim Holtz drawer pull and a dymo label.  I then swiped it with DecoArts Traditions raw umber acrylic paint, rubbed some of that off before it was totally dry, then dabbed it with Ranger alcohol inks in Rust, Espresso, Bottle and Pool..  This is another box for husband who after having walked the dog, cooked the dinner, brought me sustenance and coffee throughout the day today, is now vacuuming the floors to make me feel guilty for having closeted myself away in my craft room.  Not working though, I'm still here, and I'm not moving.


I've been doing a lot with this metal tape recently.  Gone a little metal mental tbh.  Here are some more charity shop finds that I have 'improved'.  Or so I like to think!  

Cheery.


Saturday, 5 April 2014

April Tag a la Tim


I have my craft room up and running at last.  But it's sooo organised that I can't find anything, but never mind, once I start getting messy in it then I'm sure things will find their own place in the natural disorder. It is just FAR too tidy at the moment!

Some pictures ( before chaos reigns)


Very happy bunny.

Here my take on Tim's April tag.  Haven't got a Frameworks die, everyone in UK seems to be out of stock of the dies I want ( honeycomb and trellis) so I tried to make my own using a wee movers and shapers stamp die.  Bit of a faff, and a bit squint, but it'll do.


Toodle pip.


Monday, 10 February 2014

A Very Busy Day

I spent Saturday doing nothing but arty projects from the first thing in the morning to well into the evening.  I had an unexpected free day because I thought I had a friend coming for lunch but that isn't until next week, I found.  Crafty stuff was way better than watching both Scotland (where I live) and Wales (land of my birth) getting totally gubbed at the rugby.

Here's a round up of the day...
An ugly charity shop find was turned into a (relatively speaking) thing of beauty:

I used embossed metal tape, black acrylic paint and Ranger alcohol inks to get this effect.  The Embossing folders are from Tim Holtz Alterations Texture Fades by Sizzix (Diamond Plate & Rivited Metal Set and Blueprint and Gears Set).

Next was Tim Holtz February tag...


I didn't have most of the items he used, but that was okay as it makes for creativity. The 'chalked' area was made with American Crafts silver embossing powder.  This isn't very shiny, so was a pretty good substitute for chalk.  I used a random little red heart stamp and Tim's distress inks for the background, and embossed them with clear embossing powder from Papermania.  The red chipboard heart was coloured with clear distress stickles in clear rock candy coloured with a little alcohol ink.  I love that you can do that, and have any colour of glitter that you want!  I was happy with the overall result.

Next!

I had covered a box with embossed foil a couple of weeks ago (okay I'm obsessed with that at the mo) but I wasn't happy with it as it was looking far too shiny. So I gave it the rub on-rub off black paint treatment and then splodged it with alcohol ink to antique it.  Much better.


I also covered a little chest of drawers with the (Next) wallpaper we have just decorated the guest bedroom with. The handles are Tim Holtz curio knobs, just perfect for this.  This will hold some of the toiletries, soaps, shower caps and sewing kits I have hoarded from various hotel stays.  Who knows, they might all get used eventually. We just need some guests who forgot to pack there spongebags to come and stay for a month.

I love thie quote on the front (by Arrigo Boito apparently, not Shakespeare as often attributed).  It says 
'When I saw you I fell in love
and you smiled because you knew'

Sigh.


Saturday, 1 February 2014

Better Late than Never

Okay, so it's 1 February, but I've only just managed to do the January tag from Tim's 12 tags of 2014. Better late than never, and delayed because I was waiting for the pocket watch die to arrive from Sizzix.   I bought a whole bunch of dies in the Sizzix sale  in January, and can't wait to use them all.

I've also been distracted by some lovely foil tape that I purchased from  a company called Tapes Direct.  This foil tape is a lot thicker than the regular stuff you can buy, and is fantastic for embossing with.  I used it to cover a little metal box to keep important receipts in, and a tiny little bird house.


Another project with the foil is a direct lift from YouTube, so thank you Linda Neff I love the look of this.  You can find the link to her video here http://youtu.be/B8hfwQmPGYI


I've been hoping to move all my craft stuff into the small spare bedroom but this involves moving the remaining son into the bedroom vacated by son 1 ( now left home) and buying 2 new beds, decorating the new guest bedroom vacated by son 2, getting rid of 3 old beds, and buying a new craft desk.  All this has fallen down because the beds that were due to arrive this week will not now be arriving until 5 March 'due to lack of stock'.  Thanks Homebase.

http://timholtz.com/category/12-tags-of-2014/

Thursday, 26 December 2013

60th Birthday Boxes Book for Bill


It was my husband Bill's 60th birthday this month, so I made him this assembly in lieu of a birthday card.  It is made out of 2 Tando Creative mini printers trays with covers, stuck together to make a book.  The frames have been covered in silver embossing powder for a metallic finish, and each window is backed with Tim Holtz seasonal stash papers, though there may be an odd one with different paper. Many of the pieces are Tim's Ideaology pieces.

Each window represents some part of his life - hobbies, interests, work, play, family etc. and a private joke or two best left that way!

It took a long time to collect all the little bits to put in this.  I suppose his birthday has been at the back of my mind all year as quite a few of the pieces are from car boot trawls over the year.  I altered most of the pieces in some way, and made some up from Fimo.  I was particularly pleased with the altered plaster head Borg (he's a Star Trek fan) with fimo headdress and resistor.  Because resistance is futile...

Some of the references were a bit too subtle for him, so took some guesswork on his part and explanation from me.  Like the L, T ans S.  He couldn't place that, so had to explain that was the initials of me and our 2 boys! Jeez.

Anyway, he loved it, so that was good.


Thursday, 7 November 2013

Birthday boxes

I bought a new cupboard from ikea to store some of my crafting items.  This resulted in a major tidy up of my craft area, and now I can't find stuff.  Pfft.

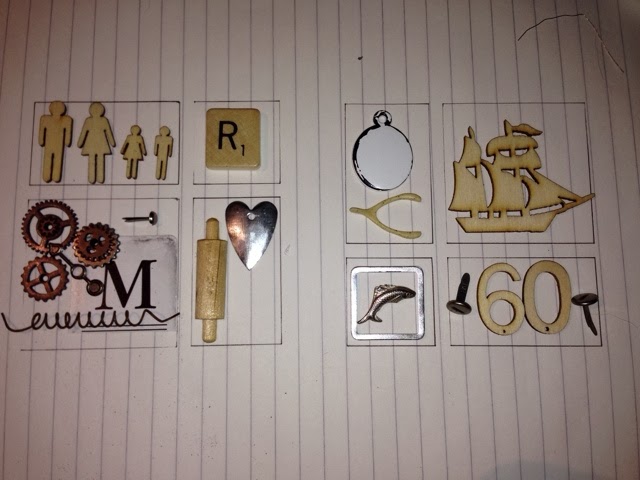
I have a couple of friends who have recently reached their 60th birthday milestone, so I made them each a little assemblage in lieu of a birthday card.  They use Tando Creative mini printer trays with covers. I LOVE working with these.  Half the fun is finding meaningful pieces to place in the windows.m

This one was for Cheryl.  This is using one mini tray with cover.


The one I made for Ron is actually two mini trays side by side, with the covers cut and pasted together to form a 'book'.


Most of the items have been altered in some way.  The fish charm was altered using alcohol ink pens, and the little plywood items coloured with acrylic paint and pens, then covered with Glossy Accents.  This is what things looked like in the planning stage :


I made a few additions to the plan, but this was a very helpful exercise.


Thursday, 17 October 2013

On My Metal


I was given a lovely wooden wine box by a work colleague (much more highly paid than me obviously, as my wine tends to come in boxes made of cardboard and with a plastic tap) and it sat on my shelf for a while awaiting inspiration.  This came in the form of a Tim Holtz embossing folder, that produces a rivited metal effect.  I would also like to thank RachO113 for her YouTube video Metal Tape Art as I saw this and couldn't wait to get started on the the box.

The first thing I did was sand down and then paint the edges of the box with a couple of layers of silver acrylic paint.  I then cut panels of greyboard to fit each side of the box including the top and sides of the lid.  I could have worked directly on to the box surface, but found it easier to work on the smaller panels, and they also gave more 3d depth to the box once stuck on.


I used cheap silver plumber's tape from the DIY store over the panels that had various shapes, buttons, mesh, paper shapes, letters, screw-type brads (basically any item I could find in my stash that looked vaguely techno!) stuck on.  Some places needed a few layers as the tape sometimes split at the edge of raised parts.  Once the silver tape had been burnished on with an embossing tool I placed pieces of Ranger foil tape and used a ballpoint pen the mark the dot rivets.   I added some Tim Holtz box corners, gears, pull handle, clock face and game spinner to the top.  The small round studs alongside the base at the front and next to the gears on the lid are from 7gypsies.


Panels were stuck on with hot glue.

Husband commandeered it for his dressing table, so that was nice...